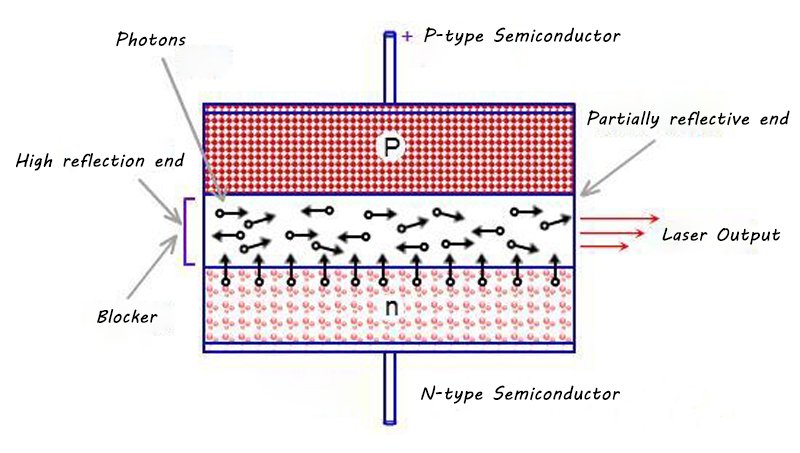
How does diode laser work
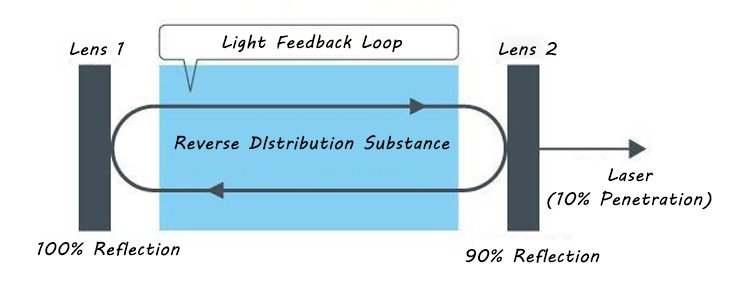
How does diode laser work? – comprehensive answer
How does a laser cutter & engraver work step by step?
- Step One: Get a picture or design file you want to be processed by the laser cutting and engraving machine.
- Step Two: Then install software and customized settings to guide the laser path according to the design file.
- Step Three: At the push of a button, the motherboard would send a command and signal to the laser header.
- Step Four: The laser header would then move left and right along the X-axis and X-axis would move forward and backward along the frame in accordance with the design file. If your cutting and engraving machine is with rotary axis, it would start rotation synchronously to get better performance for curved surfaces.
- Install proper software: for consumer desktop laser cutter & engraver, LightBurn and LaserGRBL are the two most popular software in the market.
- Find amazing ideas for cutting & engraving: you might get inspiration from our previous post “Can you make money with laser cutter & engraver?”
- Choose the right cutting & engraving machine for your projects: Here are some tips in our post “Which laser cutter & engraver to buy?”.
- Cutting & engraving with the right materials: Some materials you need to avoid are listed here in our post “Which laser cutter & engraver to buy?”.
How does a laser cutter & engraver work: accessories
1. Rotary Roller
A rotary roller is considered as the 4th axis for a laser cutter or engraver except for the general X-axis, Y-axis and Z-axis. Rotary attachment is an important accessory specially designed for processing curved objects. Usually, a fixed focal distance between the laser head and object surface is set for the greatest penetration force while cutting and engraving. It works for most objects with a flat surface as focal distance would remain the same as preset settings.
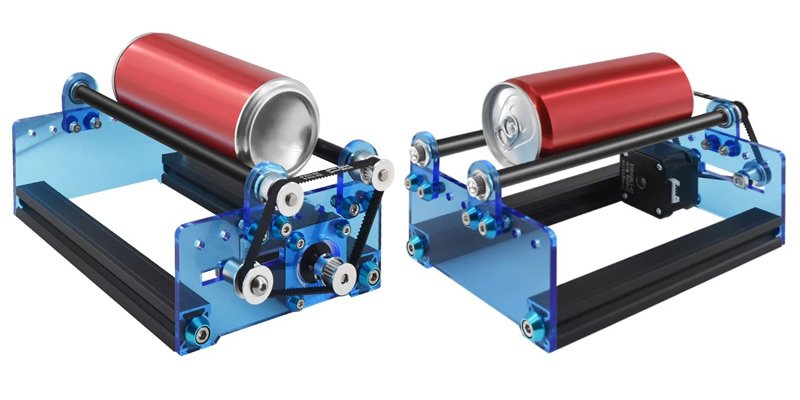
However, for curved objects, the focal distance would be different in different positions which would lead to different cutting and engraving depths. The purpose of using a rotary roller is to use a rotary axis to replace the general Y-axis as it would keep rotating to make sure every processed point gets the same fixed focal distance while a curved object is cut or engraved. To enable users to cut and engrave both flat and curved objects, TS3 is designed with a Y-axis toggle switch to change the processing model with a single click. It saves lots of trouble of changing cutting and engraving platforms and makes TS3 a great tool for users of all levels.

2. Cutter & Engraver Honeycomb Bed
One most frustrating concerns for desktop DIY laser cutters and engravers is that the devices are usually delivered without any cutting or engraving bed. Users tend to put it right on the desk (maybe with some pads) for cutting and engraving, there is a big chance he might burn the desk or leave terrible scars and trails on the desk by chance. That’s why we provide a honeycomb bed with a metal pad for our TS3 laser cutting and engraving machines. Other uses for honeycomb bed includes structural support, energy absorption, light diffusion, airflow and much more.

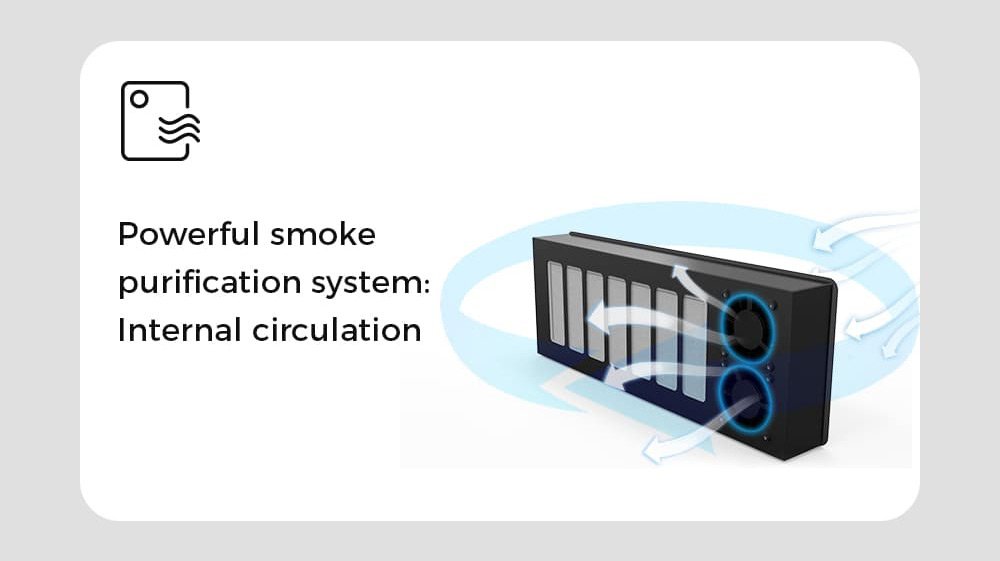
3. Ventilation System & Extraction Fan
For most consumer DIY laser cutters and engravers, there is no ventilation and extraction system at all. An enclosed laser cutter & engraver for home use with decent ventilation and extraction system would be really great options to consider if you are planning to get one. Instead of using a pipe or extraction fan to exhaust smoke out of the enclosed housing of the laser cutting machine, TS3 uses internal circulation for smoke purification. The system is with two extraction fans and a pad with active charcoal. When cutting & engraving starts, the extraction fans start to work and force smoke or dust flow into the purification container with active charcoal pad. The process goes on continuously until cutting and engraving are completed.
Conclusion
Knowing how does a laser cutter & engraver works give you competitive advantages while choosing the right device for your demands. It also saves lots of time and money on testing different options. If you have any questions or doubts, please feel free to leave a comment and discuss with us.

TwoTrees CNC Engraving Machine TTC450
上一页 下一页 TTC 450 TwoTrees CNC Router Machine The TwoTrees TTC450 CNC Router is a

TwoTrees TS2 20W Laser Engraver
上一页 下一页 TwoTrees TS2 20W Laser Engraver The TwoTrees TS2 20W laser engraver/cutter is perfect

TwoTrees TTS-20 Pro New Generation 20W Laser Engraver & Cutter
上一页 下一页 TwoTrees TTS-20 Pro New Generation 20W Laser Engraver & Cutter TTS-20 Pro is

A Comprehensive Guide to Laser Engraver Software
A Comprehensive Guide to Laser Engraver Software Unlock Your Creative Potentialng Materials for Laser Engraving

What is the difference between Laser Engraver & Laser cutter?
What is the difference between Laser Engraver & Laser cutter? Introduction The world of laser